A Beginner's Guide to Vinyl Crafting with a Cricut

Have you ever heard of 'Impulse Hobbying?' Even if you
haven't, it's something most of us have participated in at some point or
another. You know, you think a hobby or craft sounds so exciting, so you buy all
the supplies, and then... they sit and collect dust. This time, I was determined
to make that Impulse Hobby a lasting passion, and I'm going to show you exactly
how my Cricut stopped collecting dust and started making me some awesome
stickers.
Jump to:
What's in the box? Unpack your Cricut
This can honestly be the hardest step! As someone who sometimes enjoys
thinking about doing things more than actually doing them, the first hurdle is
the most obvious. Try to think of it like opening a present- the purchase is
made, and all the goods are just waiting for you. If you, like me, sometimes
have problems using the things you buy, I recommend removing all the materials
from the box as its own step. You'll obviously have some garbage after you've
unloaded, so make sure you have space in your recycle bin in advance. I know
clutter is one of those things that can really stop me dead when thinking about
starting a new project.
Trash is trash: Make sure you throw the garbage away!
Don't use a kept box as an excuse to repack the machine and return it. Really
destroy that garbage. Rip up the box if you have to. Throw it away. A Cricut is
on the larger side of hobby purchases, and it will be far too easy to talk
yourself into just returning it and thinking wistfully of the projects that
might have been. Don't go there! Junk the junk, and commit to using your
printer. You can look at the included materials at this point or not. The most
important thing here is that it doesn't stay unopened. You bought it for a
reason!
Now, I knew I wanted to use it for sticker printing, so when I
realized the included materials didn't have any vinyl, I bought some. I did a
bit of research (amazing, I know) and found ORACAL brand vinyl was highly
recommended and definitely compatible.
You
can shop for ORACLE vinyl sheets here!
You
can also SHOP BY COLOR here! I got silver and gold because I like shiny
things. Tip: Ordering a different material online will prompt you
to revisit your machine once the materials you want arrive. This can help put
you in gear to start using your Cricut!
Seeing is believing, so set up the machine in a highly visible
location
This is so important! Other people might count this step as a ‘gimme,' but I
know this can be one of the most valuable tools in getting a new passion or
project underway. Whether you're waiting for your
desired vinyl film to arrive, or waiting for the right moment to get
started, you have to be able to see that Cricut just waiting to be put to use.
Look. The number of times I've gotten a shiny new toy and taken it all
out only to put it away someplace I'll never look at it again feels too high to
count. If you take it out only to hide it away again, then we're back at square
one. The Cricut has the benefit of being a tad bit large, which helps, but I
found the easiest way to get myself to do something is to make sure I have to
stare at myself not doing it as often as possible. Embarrassing, I know…
With the Cricut, this is easy. It's a
printer, and much of our lives are led online. So, set your Cricut up in the
area you use your computer most, that way you have to look at its pretty, sad,
unused little face and remember that you have it in the first place. You've
already unpacked it, so there's no turning back now.
They'll tell you this later as well, but the Cricut requires 10-12” of space
behind it to operate. You do not have to do this here! Just make sure the
machine is visible. You can always shuffle it around later when it comes to
usage, and make sure to keep the included materials nearby as well.
Get excited! Look at what your Cricut can do!
This is so important! Other people might count this step as a ‘gimme,' but I
know this can be one of the most valuable tools in getting a new passion or
project underway. Whether you're waiting for your
desired vinyl film to arrive, or waiting for the right moment to get
started, you have to be able to see that Cricut just waiting to be put to use.
Look. The number of times I've gotten a shiny new toy and taken it all
out only to put it away someplace I'll never look at it again feels too high to
count. If you take it out only to hide it away again, then we're back at square
one. The Cricut has the benefit of being a tad bit large, which helps, but I
found the easiest way to get myself to do something is to make sure I have to
stare at myself not doing it as often as possible. Embarrassing, I know…
With the Cricut, this is easy. It's a
printer, and much of our lives are led online. So, set your Cricut up in the
area you use your computer most, that way you have to look at its pretty, sad,
unused little face and remember that you have it in the first place. You've
already unpacked it, so there's no turning back now.
They'll tell you this later as well, but the Cricut requires 10-12” of space
behind it to operate. You do not have to do this here! Just make sure the
machine is visible. You can always shuffle it around later when it comes to
usage, and make sure to keep the included materials nearby as well.
You'll definitely want to start much more simply than all that, but here's
where your ‘Impulse Hobby' can end up.

Today is the day: Hook the machine up to your computer
The machine is ready. The machine has a purpose. The machine wants to be
used.
And you want to use it.
Try to have as little time between
steps three and five as possible. If you're looking at a guide, you're probably
already there. Congratulations! You've fared much better than I in the time gap
between purchase and use. Much better, believe me.
The fact is, the
sooner you plug it into your computer, the less guilty you feel the longer the
procrastination goes on. We had a Cricut for quite some time before I started
messing around with it (quite some time…) and it's never fun to realize that you
aren't doing something. Still, this isn't as easy for some as it is for others,
me being a prime example. But whenever you reach this step is a good day to
reach it!
This is where putting your Cricut and the included materials
close to your computer will come in handy. The printer will come with a USB
cable for hook-up, which is always a lot easier and more straightforward than
Bluetooth. Don't worry, you can always mess around with Bluetooth capabilities
once you're underway.
It's a lot easier to think about
long-term ease of use once the actual ‘use' part has already happened.
Install the Drivers and take a look at what you've got
Plugging the Cricut into your computer should prompt a driver install. I
don't think I need to tell you, but essentially this is just the software that
will allow you to use your Cricut machine.
If you're technologically
unlucky like me, though, no prompt will appear. This adds an unfortunate extra
step that I took so you don't have to. If your computer doesn't prompt driver
install, you can click through the link I included and find the drivers you
need.
CLICK HERE FOR THE
DRIVERS! YOU CAN DO IT, I BELIEVE IN YOU!
This is a great time to
look at the welcome book and quick start guide they've included. Downloading the
drivers is rather quick, but browsing the official materials is a good way to
pass that bit of time and demystify some of the processes. Play around with the
mat- be careful, it's sticky- and thumb through some of the sample materials.

The Cricut Walkthrough
A cool thing about the Cricut is that it prompts you with a walkthrough right
away using cardstock. But be warned! It's not as detailed as one might like. If
you want to get right into things, feel free to skip ahead.
I was so
cheesed when the Cricut walkthrough didn't tell me to remove that plastic film
on the cutting mat and ended up cutting it and not the cardstock, which ended
the walkthrough, sliced up my plastic film, and generally was a bad time for
everyone involved. Everyone being me and the Cricut.
Remove the plastic
film entirely.
Don't put your materials underneath it and then place the
plastic film back on top. This seems like something that someone else might find
obvious, but I sure didn't.
Because the mat is sticky, (don't be fooled
by the phrase ‘LightGrip' printed on the corner) it's a good idea to hold onto
the plastic covering and put it in a clean space until you're finished. That
way, once you're done with your project, you can cover your cutting mat again
and keep it clean.
If you don't feel like using their short little
walkthrough, you can skip it and get right onto what you want it for. In my
case, I wanted to make some stickers. So, I got my vinyl ready and took a look
at what they had to offer.
The right tools for the job
Cardstock projects can be as easy as pressing out the eliminated areas by
hand, (the little popping sound is rather satisfying) but for sticker art, your
fingers won't cut it (get it?) If you don't have the tool kit, don't worry. You
can swap out a lot of these little specialty tools for things you'll probably
already have around the house!
Now I did end up buying the little tool
kit that Cricut offers (part of the original impulse buy), but say you don't
have any of that? Here's what the basic tool kit looks like:

The pack itself comes with tweezers, a 'weeder,' a spatula, a scraper, and
scissors. Here's how you can DIY these tools of the trade:
- Tweezers are a given. In fact, after using the Cricut fine-point
tweezers, I prefer my at-home tweezers better. Unlike your standard at-home
tweezers, where you control the pressure of the grip, the included tweezers
here have a standard grip, and you only control the tweezer's opening. This
is all well and good unless you're dealing with itty-bitty pieces and need
to really grab hold.
- The ‘Weeder' is that little tool that looks like a
dental pick, and hey! If you have a firm, metal dental pick at home, that's
going to get the job done. You can also use clay-sculpting tools. But if
you, like me, don't have any of that stuff, there's a really easy way to go
about this.
- The weeder is easily replaced by a Needle. If you're
having some trouble keeping your grip on one, you can press the needle
firmly and deeply into an eraser, creating a fine point with a firm grip to
lead the pluck.
- The Spatula may be one of the more difficult tools to
replace, as it is incredibly thin metal and rather small in size. However, I
found myself not needing it. I was more than satisfied with the weeder, the
tweezers, and my fingers. If you do want that tool, which can be valuable
for larger projects, you can use a butter knife for a similar effect.
- The Scraper is that weird little thing in the
background. It can be used to press down stickers or to clean your cutting
mat. This can be important in keeping your projects clean and is also why I
recommend holding onto the plastic film that covers your cutting mat. You
probably can guess, but this tool can be easily equated to an old credit
card.
- The Scissors are actually pretty important in the grand
scheme of things. If you want to use your kitchen or craft scissors,
obviously you may do so. However, I personally would recommend buying a new
pair specifically for use with your paper crafts. That means keeping them
separate and using them only for your Cricut projects.
Where oh where is my project?
This made me feel incredibly foolish, but some of the starting points for Cricut
are in strange places. Once you've gone through the tutorial, you'll end up on
the Cricut home page. This has a lot of cool resources if you have the mental
capacity for resources.
If you're like me, though, you want to start
before you even have to consider clicking through any of this. Such a large list
of things to pick from and look at can be overwhelming, so I just wanted to get
to that blank canvas.
My brain can be scattered and being confronted
with all those Cricut links cluttered up my brain until I found what I was
looking for. You can get to the canvas two ways. You can click the ‘new project'
button on the top right of the Cricut homepage:

A hamburger menu, by the way, is what it's called when you have those three
little lines on top of one another to denote selections. That is the official
name of it. I'm not making it up. All those little menus have names, actually,
and
they're all quite fun.
Start with an image, any image
If you already went through their little walkthrough, so you have the basics
of how to operate the Cricut machine. But where the walkthrough is lacking is in
the practical use of the Cricut Design Studio. This took me some time to muddle
my way through, so let's get right into it.
My biggest issue with the
Cricut Design Studio and its base programming, that is, without the Cricut
Access subscription, is the fact that there aren't many included options. You
get a base set of shapes, text options, and of course templates.
Here's
what the left side of your screen includes:

As you'll notice, there is no ‘draw' option, and you can only start playing
around in the design space when you have an image placed on the canvas. So where
does that leave you?
Let's start by putting a shape in the design space.
You can also get started using the templates right here, but for getting a base
understanding, we'll leave the templates alone. Just click shapes, and select
which shape suits you best. For this example, I'm going to use one of the Cricut
shapes- the triangle. That drops it into the design space in the top left. Let's
see what we can do to that base image.
Pick your size
Here's where we're going to start messing around with what the software can
do. Right off the bat, you can see when selecting your image, it will tell you
the image dimensions.

You can also mess around now with the zoom function, which is dim on the lower
left side of the screen. You can also zoom in and out with the trusty control
and scroll- that is, holding down the CTRL key on your keyboard and scrolling
with either your mouse wheel or touchpad.

Selecting the corners will alter the image size. You can't, however, alter a
single dimension at a time. The design studio will keep the aspect ratio no
matter what, you can't alter just the height of an image or just the width. Ah
well.
What's really neat about the Cricut design software, though, is
that it's virtually lossless. What does that mean exactly? Well, you know how
when you expand or shrink an image, you usually get to a place where it becomes
nothing but a bunch of pixels? Here's an example of that using Microsoft Paint:

See? I made the image smaller, and it got all pixelated. Imagine the horrors of
making the image bigger. I shudder to think.
Good news: that's not a
problem with the Cricut design studio! No matter how large or small an image is,
the sharpness will remain almost exactly the same. It would be easy to assume
that this quality is only for shapes or templates included in the software, but
that is not the case. Let's take a look at this image I uploaded myself with
permission from the artist:

You spin me right round
The landing placement for any shape will of course be ‘right side up.' But
what if you don't want your triangle to be right-side up?
This is a
function that actually took me a minute to find. Normally, when selecting an
image in any given tool (even Microsoft Word has this function), you'll get a
little circular arrow someplace that allows you to rotate or manipulate the
orientation of the image.

Not so with Cricut, but that doesn't mean the function doesn't exist. Now, you
may have seen the ‘flip,' option at the top of the screen, but surely vertical
and horizontal aren't the only options!

Don't worry, they aren't. To rotate an image to any degree, you need to hover
about a quarter of an inch away from the corner. This is an approximation based
on my personal computer, so just pick a corner of your image and float in a
diagonal away from it until the curling arrow shows up.
Then feel free to spin away.

You can also rotate using the arrowed meter on the top of the design
space.

Time to operate
Here's where we're really going to get into the base functions of the software.
Let's take a look at what we have going on at the top of the screen.

In order for these options to be usable, you must have your shape selected in
the design space itself. Let's take a look at what the ‘operation' options can
do.

You'll start automatically with ‘basic cut' selected. Meaning when I go to take
a look at my triangle, the Cricut machine will cut out exactly that- a triangle.
Clicking the solid square next to your ‘basic cut' function will pop up a
selection of colors. Clicking advanced lets you see the color gradient and HTML
color codes, so if you have an exact color you're after, the design studio lets
you match it.

This can come in handy later, but for now, we're only dealing with the
operations. Let's move on to what we have next on the drop-down menu.
Now, don't be fooled by the ‘draw' selections- this only lets you manipulate
your pre-existing image. It does not let you doodle on top of it. Frustrating, I
know, but this function has its own uses! Here's what selecting ‘pen' will get
you:

The outline! Very cool. Now, instead of cutting out one big triangle, the Cricut
will cut both the inner and outer shapes. This can be hard to visualize when the
outline is so small, so why don't we go ahead and make that outline thicker?
Once you've selected ‘pen,' the area next to your selection will go from a solid
color to an outline. It looks like this:

Unlike the Basic Cut function, there are a limited number of colors for you to
choose from. That is, you can't select a color that isn't on the list given. But
what we really want to look at is that option above the color list.

Clicking through that drop-down menu shows you the available densities you can
choose from when using the ‘pen' option. Let's make the triangle outline a bit
bigger.

I've gone ahead and chosen the thickest option, Calligraphy. You'll also notice
my color options became very limited, but that's neither here nor there. Now, if
you're after an outline thicker than this, or if you want more options when it
comes to color, there is a workaround that I'll get into later using the
‘Offset' function, which you can see nearby on the top menu.
All that
aside, now it's easier to see how the Cricut will cut both the inner triangle as
well as the outer triangle. This can be useful if you're trying to get a clean
shape and don't want to take your weeder to the actual sticker you're going to
be peeling.

You'll be left with your triangle inside, but there will be a margin of space
around it. Alternatively, you'll end up with a thin triangle outline.
Next up on our list we have Foil.

Now, this is a tool that requires another set of
additional materials, and isn't one I've personally used for that reason.
Essentially, this is for foil transfers. That is, you have your base material
placed onto the Cricut cutting mat, and then you tape a foil transfer sheet on
top of that. Here's what something like that can look like:

The gold leafing you see on this sheet of paper was embossed onto the paper by
the Cricut. It's very cool and relatively easy, and if you're into that you
should definitely explore that option.
Next up on our list, we have
Score. This does precisely what you think it would do. Instead of cutting out a
firm line, it scores around the shape in a dotted line style.

At first, I was confused as to the use of something like this. What good would
scoring do? And then I remembered tags existed.
So, if you've ever
opened a box, torn off a piece of cardboard tag, or ‘ripped here' for an easy
open, well, score is going to be your best friend. I had no personal use for
score, so I went ahead and cruised on by, but if you have used it for something
cool, let me know!
Next up we have what I consider to be the coolest
cutting function - print then cut.

Say you want to print out a shape or a sticker that's more than a silhouette.
You want colors, you want art, you want that fun drawing your friend sent you.
Print then cut is going to be your best friend. When I first started trying to
figure out my Cricut, this was the function I went to immediately. I wanted
stickers, after all! Suffice it to say, I got a little bit ahead of myself, and
wasn't able to use print and then cut right away.
The greatest
misfortune of print then cut is that the Cricut cannot do it all. It's a cutting
machine, not a printing machine. Therefore, if you want to print and then cut,
you need to print your image out on your home printer and then feed it into the
Cricut.
It's definitely a cool piece of functionality, however, because
the Cricut will use the image file you've printed and sense the outlines it
needs to cut, so no need to worry too much about making sure things line up
exactly. Just try to line your base material to the corner of the Cricut sheet
and slice away.
Last up we have a guide.

This tool is a tool specifically for keeping the outline of the shape without
actually cutting.
A guideline will show up as kind of a thin purply
color, and can only be moved. This is great if, say, you want to print out a
bunch of different images in a triangular shape, but don't want to cut the
triangle out itself.

That is the ugliest amalgamation of shapes humanly imaginable, but you get the
idea.
Now, you'll be able to print everything inside the triangle, while
leaving the triangle itself out of it. This can be useful if you only have a bit
of material to work with, or if you are planning on pulling a Lisa Frank and
making a sticker sheet.
This is also a really good way to leave notes
for yourself on the canvas without worrying about deleting them, or if you're
like me, forgetting to delete them later on.

Cut and run
So, you've landed on the image you want to cut, the most amazing triangle
you've ever seen, and you're ready to employ the -cut element of the Cricut.
This, much like getting to the canvas earlier, was weirdly difficult for me to
find. This is in the exact same place as ‘new project' was from the Cricut
homepage- in the very top right corner of your screen.

I'd have given anything in the world for that button to just say ‘cut,' but the
button needed to be as cute as the machine itself, apparently.
Once you
click that little button there, you'll get to a secondary screen. This will show
you a few things. The main section shows you the Cricut cutting mat.

No matter where you've placed your design on the canvas, this is the only place
to relocate the cut itself. If you're cutting a triangle and you wanted to cut
it not in the top right corner, here is where you manipulate your cutting
location.
On the left-hand side of the screen, you'll see a few
different options that are all pretty self-explanatory.

For this basic cut, we're leaving the material load type as ‘mat,' which I
imagine will be most, if not all of my printing. Despite the wording, this is
just the thing you're putting your material on top of.
Material size can
be important for print then cutting, or for any other size of material. Print
then cut will almost always be using 8.5x11” as that is the most common paper
size. But that's neither here nor there. For now, I have a 12” square of vinyl,
and one triangle.
If you're reusing materials, you can leave it as
12x12, just as long as you make sure that the area you are cutting on actually
has material in that location.
If you're wondering what that smaller mat
image with the ‘1' is, don't worry, I cover that in more detail later. This also
has to do with the area that tells you how many mats to prepare.

Go ahead and place your material down on the cutting mat and get ready. This is
where you realize that the ‘light grip' the cutting mat says on the corners is a
load of hooey. I don't know what kind of grip strength the designers over at
Cricut have, but their hold must be iron-tight.

This. Is. Sticky.
Try to get your placing down the first time because
pulling the material you're using up and then down again can result in curling.
This is particularly true for thicker materials, such as vinyl. I found the best
way to do this is to start in the corner and press down from there.
Apply some pressure when placing your material, and make sure it's lying flat.
Again, this is easier if you haven't picked up and put back down your material
sheet seven times.
Trust me, I would know.
It's very interesting
to go from a sheet of vinyl to a tube of vinyl because you're unable to place
the sheet the right way. The curlier the sheet, the harder it is to get it to
lay flat on the mat, particularly in the corners. You don't want to have any
cause for catching in the machine.
The Cricut will prompt you with the
next steps, and these instructions are very easy to follow, but let's go over it
just in case.
Make sure you have the correct material selected on the
machine dial, which should look something like this:

The further spun to the right, the heavier, or thicker, your material. I set
mine for vinyl in between that and iron-on, just to be safe. Then, it will
prompt you to load your materials into the Cricut using the load button:

Line up your cutting mat to lie flush against one of the guiding edges, and make
sure that both edges are underneath their guideposts.
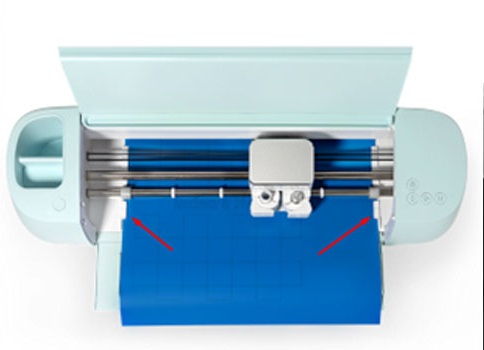
Make sure the machine takes the cutting mat before continuing on. This button is
also how you unload the machine, so if you mess up, go ahead and press it again
to try once more. You'll know when the machine has a good grip on the cutting
mat, but applying a bit of even pressure to the far edge of the mat to push it
into the Cricut's gripping wheels will help.
Finally, press that Cricut
button and watch it work!
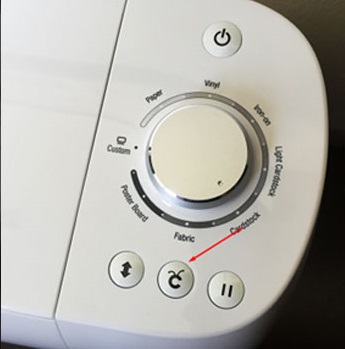
Now if you run into any problems, that pause button will stop the cut, and you
can choose to cancel it from there.
You know what else has layers?
So, you've printed your first sticker, the coolest triangle known to man, and
you've stuck it in the best place imaginable. But there's still a lot more to
do! Now if you're familiar with other image rendering software, like Photoshop,
layers are nothing new. But if you, like me, don't have the most familiarity
with how to use layers, this can be a bit of a difficult thing to wrap your
brain around.
But don't worry, my brain is wrapped for you.
When you add an image to the Cricut design studio, whether an included
design or an image of your own, it creates a layer. You can see the layer on the
right side of the screen.
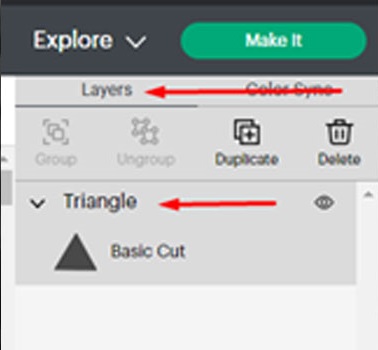
Right now, the only image I have on the canvas is the single triangle, so the
only layer visible is that single image. But what happens if you add another
image, say, a star?
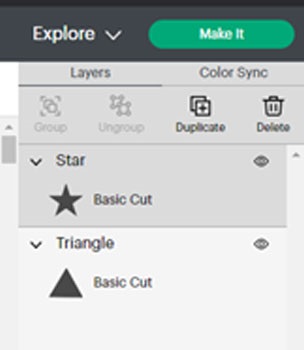
Well look at that- a new layer has been formed! This is an easy way to select
the image you want to manipulate without having to go through and click a bunch
of images on the canvas itself if you have multiple shapes you're working with.
This is also where color-coding your images or shapes can be valuable,
as it will be much easier to manipulate them in relation to one another if they
are different colors, or if you have multiples of the same shape.
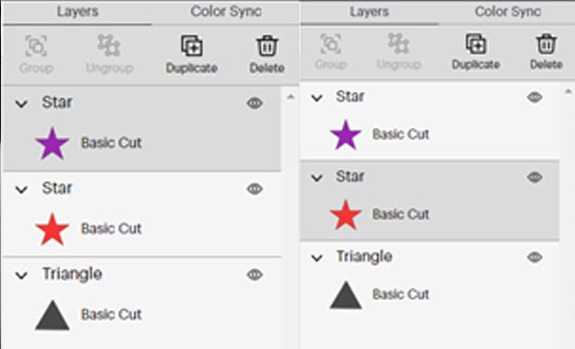
See? Now, I can tell my two stars apart without having to displace them if I've
set one where I'd like it to be. I can also select the purple star or the red
star without having to move onto the canvas.
You're layering up! Now,
instead of a triangle, you want to make a triangle with three stars inside of
it. You can, of course, print and then cut. This is if you want to keep the
colors as you have them.
Bear in mind, though, if you select print then
cut, the triangle and stars will be printed, then the triangle and stars will be
cut out. The Cricut will make four cuts.
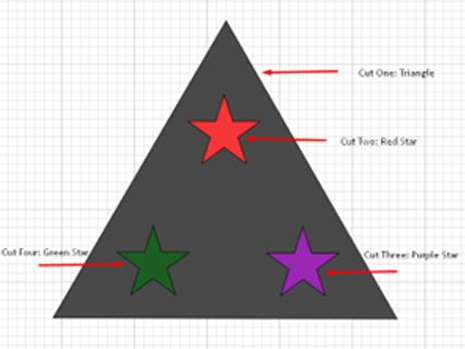
But right now, we're going to say you want all four shapes- the triangle, as
well as the three stars. Remember earlier how I said I'd talk about the ‘prepare
mats' and the image of the mat with the number inside of it? Well, now's the
time, because that also has to deal with layers.
Let's say you wanted
this exact thing. You wanted the Cricut to cut out your triangle, and the three
stars inside of it. Great! Let's make it.
Take a look at what happens:
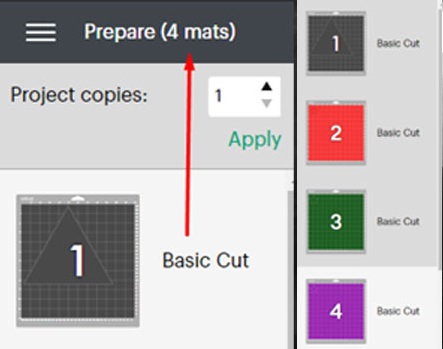
Huh? Four mats? But it's just one image!
The four cutting mats
represented by the number and their corresponding colors (which is so cool) are
because you have four different layers in your design space. So, what does that
mean?
Well, what it means is you'd load up your sheet and send it
through the Cricut, and it would spit it out.
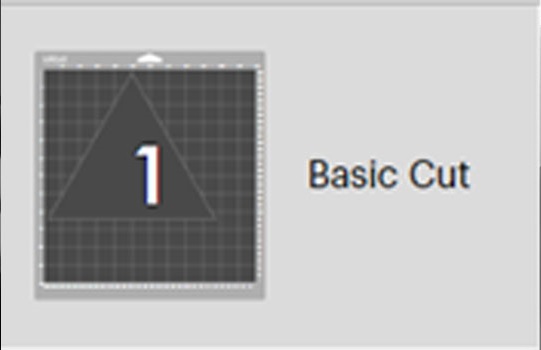
Then you'd load up your sheet and send it through the Cricut, and it would spit
it out.
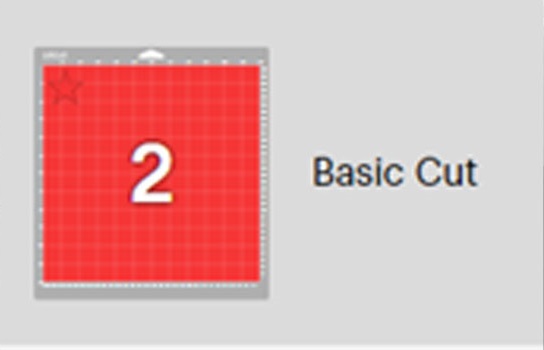
Then you'd load up your sheet and send it through the Cricut, and it would spit
it out.
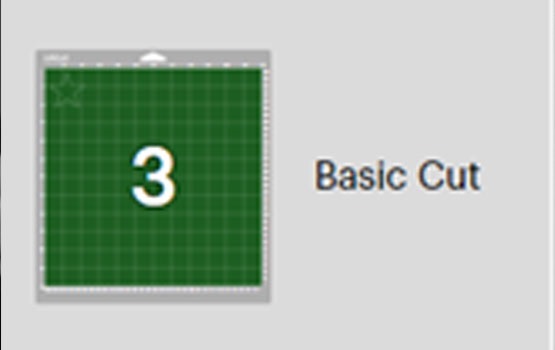
Then you'd load up your sheet and send it through the Cricut, and it would spit
it out.

Now if you're printing all on the same sheet of material, this can cause an
issue. The issue is alignment.
I suffered through this. Suffered. I
didn't understand why the image I was using and the outline that I wanted wasn't
lining up. Why couldn't I get my image to print out and have the outline give
that extra bit of space I was after? What gives? I was doing everything
correctly. I was loading my materials and putting it through exactly the same
way.
Well, not exactly, and that was the problem. No matter how much I
tried, no matter how many times I tried (so many times), I was completely unable
to line up the cutting mat the same way one hundred percent. It's just not
possible. We are only human, after all.
Not only that, but if you click
through, you'll also see that all three of your stars and your triangle are all
printing out from the same place. Remember how I said the only area you can
adjust the placement of the cut according to your materials is after you click
‘make it'? Well, look where all the shapes will be cut from.

That's right! The cut will start in the exact same place. Now, instead of having
a nice easy time of it, you'd have to try to randomly alight all your stars in
the place you wanted them in the triangle. Not only that, you can't see how they
layer from this screen, so you're flying pretty much blind. This is lame, and I
wish the software carried over your spacing, but that's neither here nor there.
Ah…if I had only known then what I know now.
You want your
triangle and your three stars to cut, but you don't want to have to feed your
materials through the cricket four times because trust me, it will not end up
how you want it to end up.
There is such a simple and easy way to fix
this and it infuriates me to think about how much vinyl I burned through before
I figured this out.
Head on back to your canvas, and on the top bar
you'll see a button to ‘select all' right next to your operations feature

Now, each shape is selected in bulk. Head on over to the right side of the
screen where you can see the layer display, and down at the bottom, you'll see a
few options.
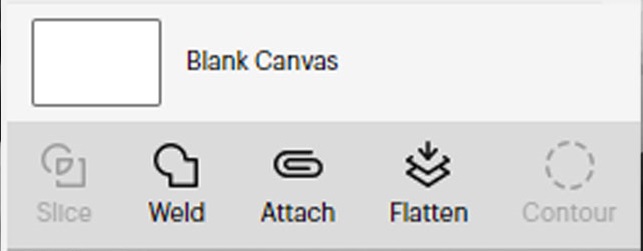
We'll get into the others in a minute, but for now, you want to focus on
‘flatten.' Take a look at what happens to your layers and the ‘make it' page
after you've selected that.
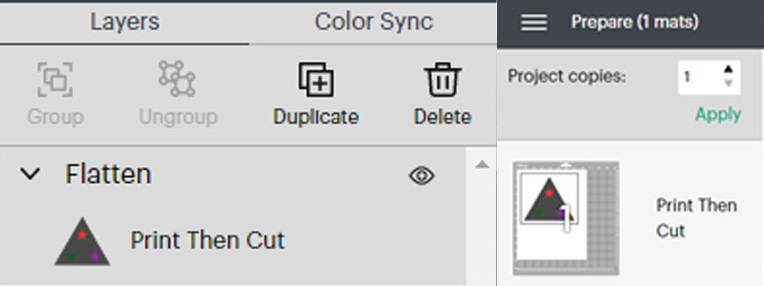
Et voilà! One image, one layer, one mat, one cut. Now if you get to the cutting
page, or if you're altering your image and decide something isn't quite right,
don't worry. You can always go in and unflatten that image later. If you have
multiple flattened layers, you can also choose to unflatten one, but not the
other.
I went ahead and duplicated my flattened image, a tool you can
see right above your first layer and unflatten it so you can see what I mean.
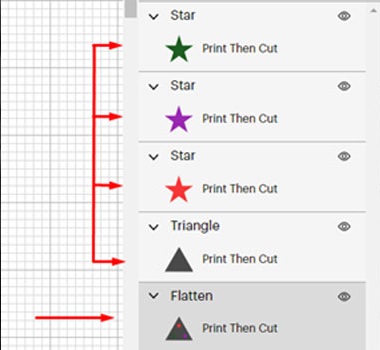
Or you can double-flatten it. Two little triangles living their best life.
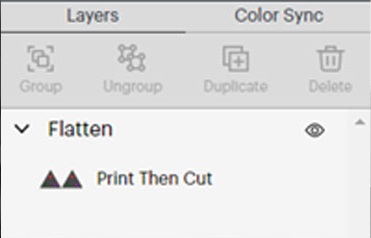
This is a great tool for making a lot of different cuts on the same page. Set up
your canvas however you want, with whatever you want, and let the Cricut run its
course on a single sheet.
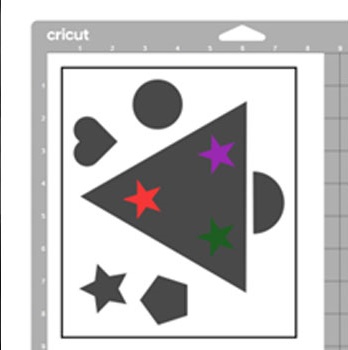
If you're working with layers and only want to flatten a couple of things and
leave the others solo, you can also go to the layer selection and CTRL-click the
ones you're after. See here I've selected two stars, and those are the two stars
that got flattened. They now move as one layer.
You'll also see a little
eyeball insignia next to each of your layers. This is probably instinctive, but
it hides whichever layer you've selected when the eye is crossed out.

This doesn't delete the layer, and it doesn't mean the Cricut won't cut the
shapes. It just means you can't see them, which can be good if you get into
serious business designs with lots of shapes and complex visuals.
If you
end up with a lot of layers, the sidebar can get a bit cluttered. Utilizing the
hide and flatten image functions is an easy way to combat this, but you can
always rearrange the order of your layers by right-clicking and bringing that
layer forward or backward. You can do this one layer at a time, or send a layer
right to the top or right to the bottom.
Just make sure to arrange them
in the right order when it comes to printing!
Slice and Dice
Now, you may want to manipulate your triangle, but you want to be able to see
the blank space you've eliminated. Take our current example:
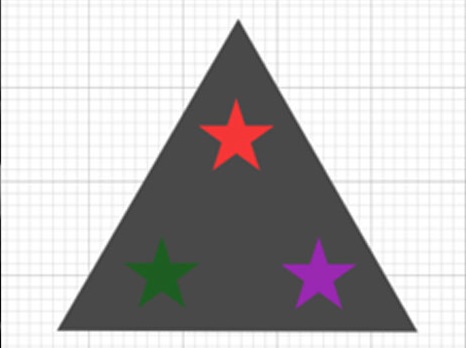
You want the triangle, but the stars will also be cut out from it, right? That
can be kind of hard to visualize, but Cricut has you covered.
First,
make sure you have your image unflattened- that is, each shape has its own
layer. Then select your master shape or the one you want to cut the negative
space from, in this example, it's the triangle, and one of your stars. Then at
the bottom, click slice.

That will create one new layer and will manipulate your larger image layer: the
triangle will now be sliced, and the new layer will be of the sliced star.
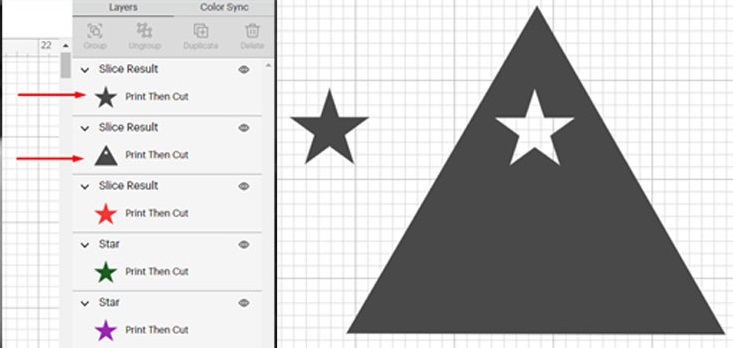
Notice that it doesn't eliminate any other layers, just creates one and changes
the other. You can do this as many times as you'd like, as long as there is
still space in the big shape to do so.
Contouring isn't just for faces
Now we're really getting into it. Right off the bat, you're going to need to
know a few things. Primarily, contour does not work on flattened images, which
kind of stinks. Contour also only works on one layer at a time, and only works
on what the Cricut would register as a more complex image.
Let's take a
look at our sliced-up triangle.

This has gone from a simple image, one with only one single cut line, to a
complex image now having four cut lines. But you don't want to cut all four of
those. This is where contour comes in. Right away, you can see the new option
has come into play down at the bottom of your layer panel.

Click it and take a look at the screen that follows.

This screen is telling you each and every cut the Cricut is going to make. The
triangle, and the three stars. But maybe you don't want it to cut the star on
top for whatever reason. Well, go ahead and select that star on the righthand
side.

You can see that this darkens the selected layer on the right and dims the
actual image placement on the design. Take another look at your triangle in the
design space.

The star! It's gone! This is totally reversible by clicking back into contour
and unselecting that layer. But wait! Didn't I just cut all those stars out? Why
would I want to undo that when I could just not do it at all? Well, this is
where more complicated stuff comes into play. Since we're only dealing with
getting ahold of basic functions, let's take a look at a slightly more
complicated image included in the Cricut design studio. Find what you're after
and click ‘add to canvas' in the bottom right-hand corner.

I'm not fond of where the ‘add to canvas' button is, but I did end up finding it
eventually. Here's the shape that I found:

So, fancy. So complicated. But I don't like all those little holes.
Well, here comes contour to save the day.

Now this image has a lot of cut lines. But I don't have to worry about finding
them on the side panel, I can select them right in the image itself. Remember,
the main image will dim the cut lines you've decided won't cut it. I went ahead
and chose to eliminate four of the circles.

Much better! You can select any of the shapes to eliminate from your cut, except
for the external shape. In our simple example, it was the triangle. Here, it's
the main shape of the sign or tag. Everything else is up for debate.
If
you're messing around with the image and you can see it in the background of the
contoured screen, you can see those changes happening real-time. Take a look
here in the top left corner of the design studio and you can see what I'm
talking about.
We're ready for you, Dr. Frankenstein
So, you have your triangle, now you want a house. But- oh no! The free Cricut
images don't include the shape of a house! Here's where the weld function comes
in. The weld function is an excellent tool for creating patterns or overlaying
images with one another. This function smooshes two or more shapes together into
one. This can include solid shapes or negative spaces you might create using the
slice function.
I want to design a house, so what can we do? Well, let's
put up our triangle again, and also toss a square up in the Cricut design space.

You can see I made it so the images overlap one another. Next up, I'll select my
two layers from the right-hand panel, and click ‘weld.'
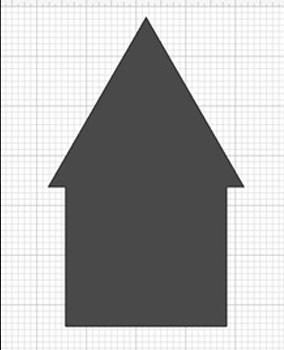
I am now left with a house!
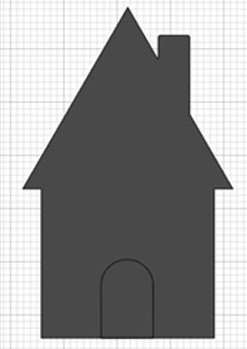
You can see how the square and triangle are no longer separate shapes, but one
shape. Notice the outline denoting the difference is now gone.
But we
can go further than that, right? Using the features and functions we've already
learned; I can make this house into a much more friendly image. Why not start
with a doorway and chimney?
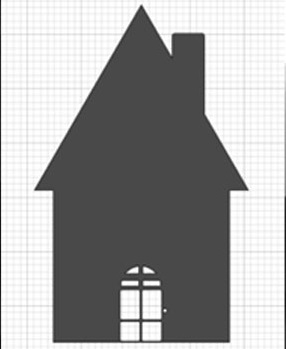
But that's not quite how doorways look, is it?
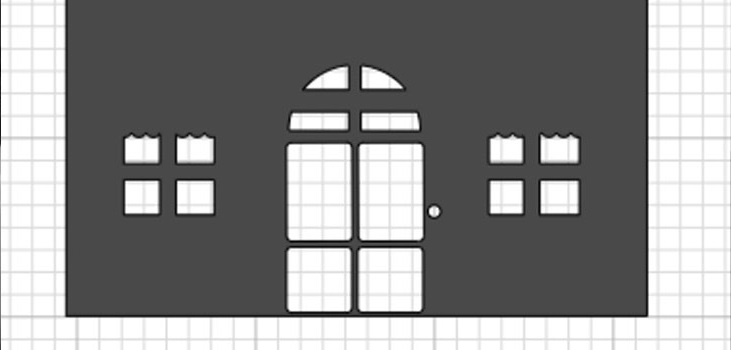
And on you go from there!

When you get into messing around with a lot of images and shapes, make sure you
take a look at some of the specific dimensions up top when selecting any given
shape. That way, you can make sure the shapes you want are lined up, and the
same size.
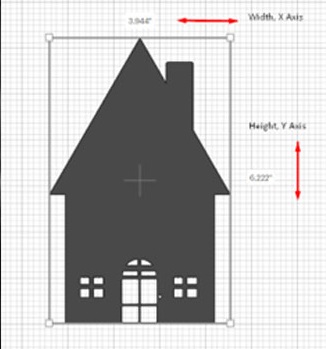
For those of us who haven't been in school in a while, the X-axis and the shape
width are side-to-side, and the Y-axis and height are up and down.
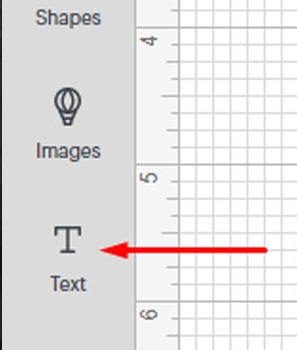
Text Me
Now, this is going to be a much smaller section, mainly because I think most
people are familiar with inputting text in an image. The text function works
like any text function. You select text, and a text box appears.

The key difference here is that you can use every other function on that
text, as though it were any other shape. You can color it, shape it, slice
it, weld it, or any other of the features. When messing around with text,
you get a secondary menu bar up top.

All of this, I feel, is pretty self-explanatory, and mimics any other
word-processing tool. The coolest thing about it, though, is when you select
‘font,' a new window pops up and you have just a slew of choices presented
in large typeface. I always hate when you're trying to select a font for
something, and the preview is this big on your screen.
You have the
option to browse the Cricut fonts, which are available for purchase.

As someone who is pretty into fonts and text, I imagine I'll be browsing
this section a lot. After all, one of the first stickers I printed out was
this:

Or you can select ‘system' from up top, and the design studio takes you down
to look at the fonts available for free.

You can also ungroup your letters! Meaning, if you want to have something
that says ‘Good Job!' but you want to be able to manipulate each letter
individually, you don't have to insert each letter individually.
Rather, you can insert one text box, type what you need, and then remove
each letter from the others into its own shapes and layers.
Thick-Framed Images
Holy cow, you made it! This is the last basic function to go over, and I
decided to save one of the simpler ones for last.
I know, I know, you're
wondering why I did that.
Well, first of all, the offset function I
found is best for use when you have your other basics already in hand. Second,
by now you may have already messed with this feature and realized it doesn't
require much guidance. Still, let's take a look at our final basic function,
offset! This is a feature in beta, but I've found it works quite well,
particularly if you would like to create a thicker ‘outline' of any given shape.
Using offset and slice, you can get thicker outlines, with more color options,
than by using the ‘draw' function.
Why don't we pull up our handy dandy
triangle one final time and go ahead and select the offset function up top?

Right away, you can see your options, which are the distance from the original
shape, and the type of corner you'd like.

You can adjust the offset to be inside the shape by moving the slider to the
left, or outside of the shape by moving the slider to the right.
Remember earlier when I mentioned wanting a thick outside border or thick
outline? The offset feature is how we accomplish this. It's also how you can
layer up images of the same kind from a central point.
So, I want my
thick hollow triangle. Well, that would be as easy as offsetting a smaller
triangle inside my original image and using slice to remove it. This will ensure
the smaller, inner triangle is directly lined up with the larger, outer shape.
That way, I don't have to worry about using my own eye to match the corners.

Here you can see my slider is to the left of the center bar, and you can see an
outline of the proposed offset image in blue.
Click apply, and a new
shape will appear. Notice how the shape starts filled in, not as an outline.
This is true when creating an offset inside your main image or outside your main
image. Here, it's inside.

Go ahead and slice it and there you have it! My thick, hollow triangle.

You can, of course, create that in the opposite direction. Notice when you
create an offset image that's larger, you also get the choice of corner style.

You can see the offset image here is in black. This is not an outline. The full
shape, a black triangle, is in the background, with the gray triangle in the
foreground. This has to do with layers, which we covered but is a tool I often
forget about.

And you can keep going, offsetting your offset into layered bliss.

Have Fun!
That's all there is to the basics of the Cricut machine! Now that you have
that all down, it'll be much easier to understand how to manipulate the more
complicated shapes you'll find in templates, images, and phrases.
The
best way I've found to think of things is to see each thing as its own shape.
The letter ‘T' is a shape, a triangle is a shape, a tag is a shape, a hand, a
strawberry, anything, and everything is manipulatable using the tools outlined
here.
Take a look around, play a bit, and you'll get a handle on all of
the Cricut tools in no time.
